|
|
How to rebuild the B-4-2.
The B-4-2 is a spring piston air gun that is built to last, this air gun is built solidly and all pins are peened (hammered secured heads), to insure nothing comes out by accident, for this reason rebuilding/disassembling the B-4-2 is little more difficult than other spring piston air guns. A cocking arm's pivot pin must be removed to completely disassemble the air gun. If you don't have experience disassembling air guns and are not handy with tools, do not attempt to do it. You will need the following tools for taking this spring piston air gun apart. One very important tool is a Spring Compressor, do not attempt to take a spring piston air gun apart without one. The main spring of your air gun is under pressure, trying to take it apart with out a spring compressor is dangerous. You may see how one is made on my page about rebuilding a spring piston air gun (check the "Index").
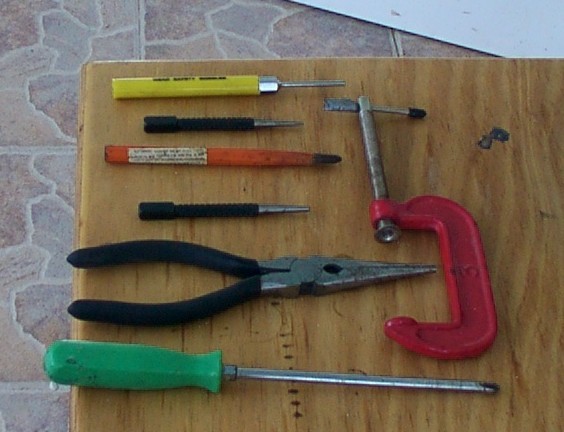
Other tools you will need are different metal pin punches, needle nose pliers, a hammer and a screwdriver. Take note of the orange colored punch, it's point is cone shaped, the cone shaped punch is a must for reinstalling the cocking arm's pivot point properly.
After taking off the stock of the B-4-2 you are ready to start with the task of taking it apart. One of the things you want to do first is lower the piston's catch device to be able to take out the piston and the pressure chamber. Since all the pins on the trigger's device are peened (on the B-4-2), we will lower and hold the catch device out of the way with out taking the trigger's assembly apart.
Right behind the trigger's box assembly there is a piece of metal that has a spring on top. First pull the trigger and raise the part and place something to hold it in a raised position through out the job. Note: I used a metal punch to keep it raised, but a small block of wood would work better, the punch's long end interfered with job and made the job harder.
|
|
|
Tools
Some of the tools you will need are different metal pin punches, needle nose pliers, a hammer, a spring compressor and a screw driver. Take note of the orange colored punch, it's point is cone shaped, the cone shaped punch is a must for reinstalling the cocking arm's pivot point properly. |
|
|
Taking out the main spring, piston and chamber.
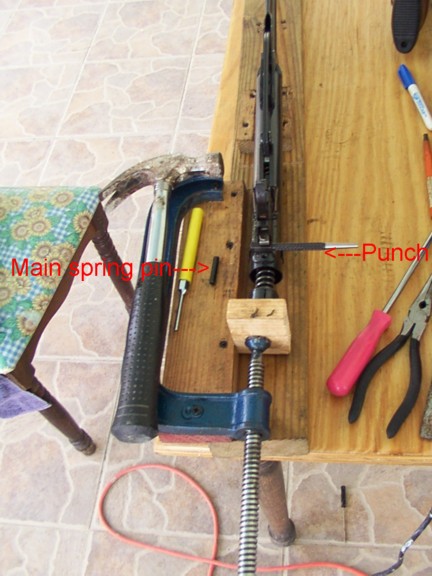
Here you will see I am taking out the main spring with a spring compressor, notice the punch that holds the piston's catch device lowered to enable me to take out the piston and the pressure chamber. After releasing the main spring's pressure with the spring compressor I punched out the main spring's pin out with the yellow handled punch tapping it with a hammer and slowly removed the main spring. Note: When taking out pins always check both sides to see which side is less peened, the side that is less peened is the side you place your punch on to punch out the pin.
After removing the main spring's pressure and taking it out. I then pulled up on the cocking arm to release the 2 spring's pressure on the cocking arm's guide and I released the 2 springs on the cocking arm's guide using a pair of needle nose pliers, this releases the cocking arm's guide.
|
|
|
Taking out the cocking arm.
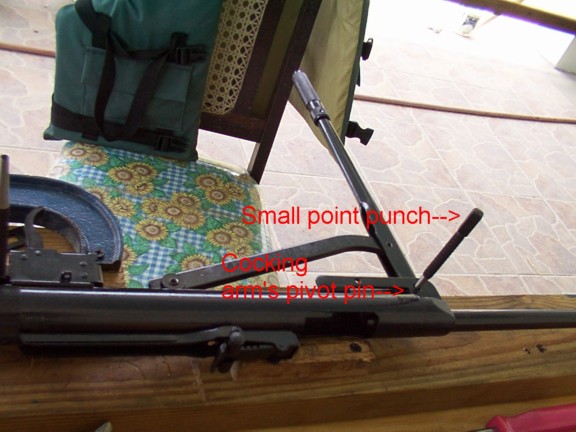
To be able to finish taking out the piston and the pressure chamber I have to take out the cocking arm out of the pressure chamber, to do this a I must punch out a pivot point. (Note: in most piston spring air guns this is not necessary). Notice that I choose the main pivot point, because it was the largest pivot point and it will be easier to work with later on, for reinstalling. Before punching out the pivot point, check both sides of the pivot point, punch out the side that is less peened. Place the pivot point on the edge of a hard surface to punch out the pivot pin using hard taps of a hammer with the point of the punch in the center of the bottom of pin's cup. Note: The point of the metal punch must be much smaller that the pivot's center cup for punching out, this allows the rim of the pivot pin's cup to fold in. |
|
|
Parts.
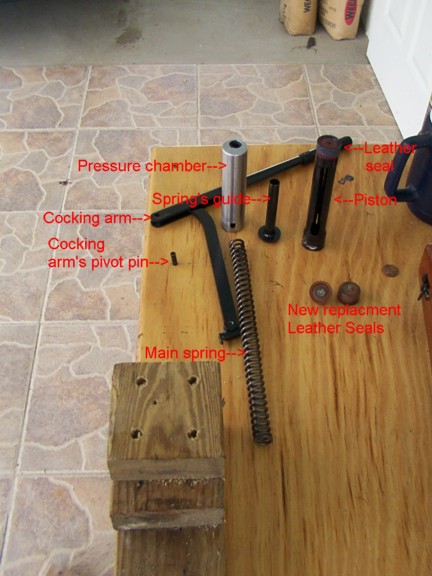
After taking out the pivot point the cocking arm's assembly and the cocking arm's guide comes out easily. Now all the inside parts can be removed. See inside parts above in the photo. Notice the replacement leather seals, this air gun did not need the seal replaced and the main spring was in prefect shape.
|
|
|
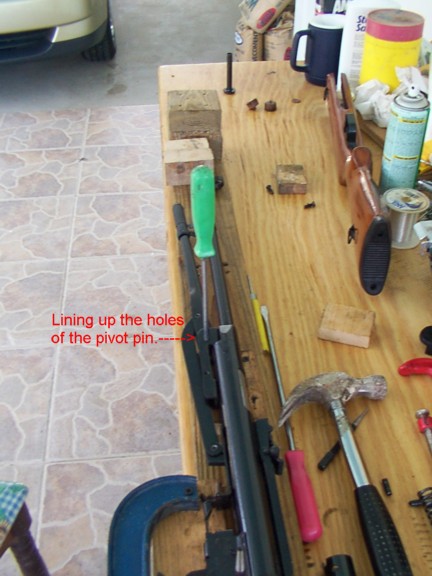
Reinstalling the cocking arm.
After checking to see everything was in top shape, I took on the task of reinstalling the cocking arm's pivot pin. First put back in the pressure chamber and piston in the air gun, then place on the cocking arms guide and insert the cocking arm's end back into the pressure chamber. After insuring every thing is like it should be, I lined up the holes of the pivot point using a screwdriver, then after insuring that every hole is lined up I install the pivot pin tapping it with a hammer gently. Make sure you use the point of the pin that you pulled out to enter the holes, this side has the rim of the cup bent in. If the pivot pin cup's lips bend outward a little, the corner edge of the cup's rim must be filed down a little to allow it to go into the holes. Be patient, it takes a while to work this pin back in, check both sides to insure the holes and the pin line up to pass through. |
|
|
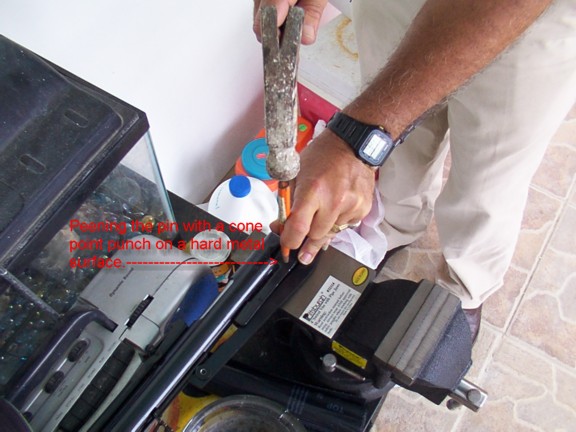
Punching the pin.
Now here is where that orange punch with the cone shape point comes in. The cone of the punch must be wider than the cup of the pivot pin and the point must be shorter than the bottom of the cup of the pin. I had to use a grinder to give this punch the proper shape. The idea here is to bend the pivot pin cup's rim back to hold the pivot pin in place. To do this you need a flat hard metal surface to insure the other side of the pivot pin makes contact with the hard metal surface (notice I am using the flat hard surface of anvil/vise). Making sure everything is properly in place, hit the punch several times with a hammer hard in the center of the pivot pin's cup, to bend out the cup's rim. When done properly you can see that the pin is securely in place, the rim of pin's cup will cover the outer hole's edge.
|
|
|
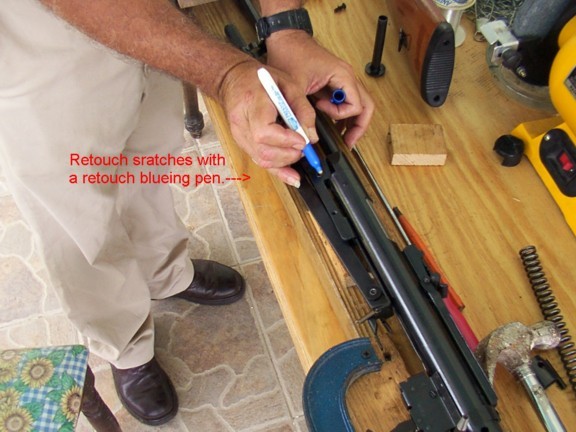
Retouch the job.
Of course after all that hammering a little retouching is in order here. I used a "Presto" gun blue pen, for a instant black touch up for steel. After using a touch up pen, wait till the treated metal darkens, then oil the pivot pin and the treated surface to prevent rust (about 15 minutes).
Came out prefect, you can't even notice that the pivot pin was worked on.
After that, it is just a matter of remembering how you took the rest of the air gun apart and putting it back together again and testing it.
So, now you know how to rebuild a B-4-2, since you know how to fix/rebuild it, this means you will have a air gun that will last you a life time, a life time of fun. Click on the last photo to get your discount B-4-2 air gun today!
|
|
|